When a loft space is not available (usually when an installation is on the ground floor), the installation method for the ceiling track will follow one of the below procedures. For this installation the installer must access the floor above and remove the floorboards to access the joists below. During this installation the fixings must be fitted to the side face of the joists, which will require joist brackets. The below fixing methods include tracks running parallel, perpendicular and diagonal to the joists.
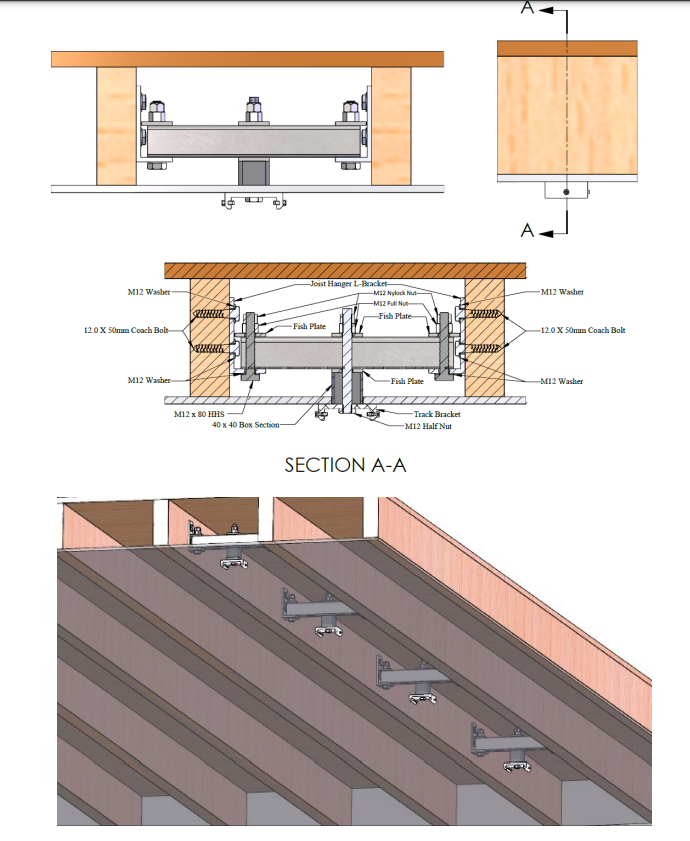
3.3.1 Ceiling Track running parallel with the Joists
This section will describe the process of fixing the ceiling track to the joists where the ceiling track is in parallel to the joist. It is not permitted for a single joist to suspend a track system, therefore during the ceiling marking out, section 1.6., the track should be positioned between two joists, at worst case, 2/3 towards one of the two joists.
Follow the process below for track installation.
1. The installer must enter the room upstairs and remove the floorboards directly above the track bracket fixing points.
2. Inspect the fixing location for any obstacles such as wiring or piping that may cause an issue, ensure to avoid obstacles where possible.
3. Ensure that the fixing point between the two joists is central, at worst case, 2/3 towards one of the two joists.
4. Inspect the condition of the joists, ensure they are suitable and no damage that may cause an issue to safety or function to the joist is present. (e.g. Rotten, cracked)
5. On the inside of the joists, joist hanger brackets are used to fix a bridging steel channel.
6. On both joists, pilot holes must be drilled into the inner face where the joist hanger bracket coach bolts are to be fitted. Using the profile of the joist hanger bracket to locate the correct fixing point, drill two holes for each bracket a depth of 50mm and a diameter of 8mm.
7. Once the first joist hanger is marked out, use a laser to perfectly align the opposite joist hanger position and drill the pilot holes.
8. Secure the joist hangers into position on the inner joist face using the given 12.0x50mm coach bolts.
9. A piece of steel channel can now be cut to length to bridge between the two joist hangers.
10. Where the distances between the joist hangers are between 250mm to 600mm, single steel channel is sufficient. Where the distances between the fixing points are between 600mm -1000mm, double steel channel is required.
11. Place the steel channel onto the joist hangers.
12. The steel channel can be secured by placing an M12x80 bolt through the bottom of the joist hanger and through the steel channel. (ensure to place an M12 washer onto the bolt first)
13. Secure the bolt to the steel channel using a fish plate and two half nuts.
14. A piece of threaded bar must now be cut to length to suspend the track bracket from the steel channel to the ceiling. Each threaded bar will vary in length depending on the joist and ceiling height. Ensure to allow additional thread for the fixings.
15. A piece of 40×40 box section must be cut to length to fit from the bottom of the steel channel to the top face of the track bracket.
16. Insert the threaded bar through the steel channel, lock the threaded bar off at the top by placing a fish plate, full nut and nyloc nut onto the steel channel.
17. Place a fish plate up against the underside of the steel channel.
18. From the centre of the ceiling fixing hole, the 40×40 box section profile must be cut out.
19. Place the box section through the ceiling and onto the threaded bar, the box section should become flush with the steel channel and the ceiling.
20. Attach a track bracket (either a single 55mm threaded hole or a double 110mm bracket threaded hole depending on whether the bracket is securing a single track or two joining tracks) to the end of the threaded bar, and secure with a M12 half nut at the ceiling end, applying Loctite 270 to the half nut.
21. The track bracket should become flush with the ceiling and box section.
Repeat all relevant steps to fit the next track bracket, ensure the gap between the two fixings are suitable to the section 1.1.
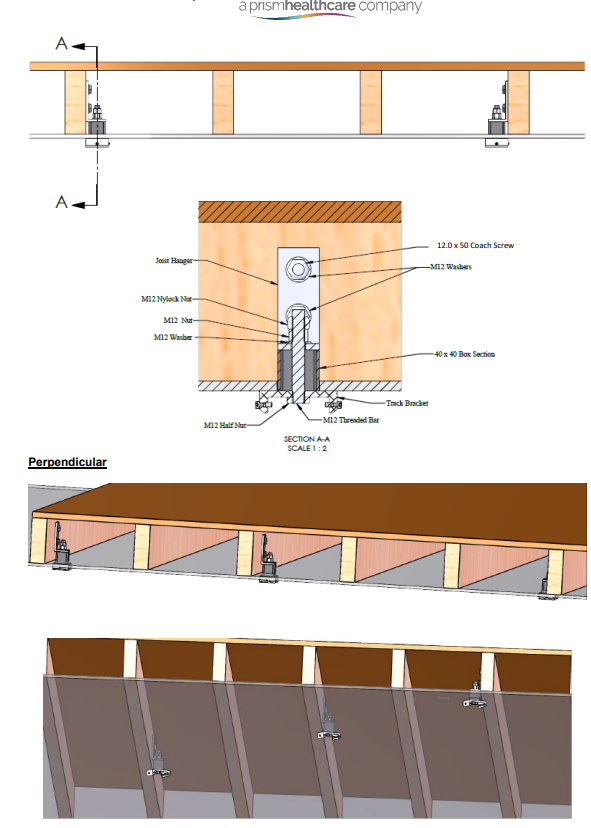
3.3.2 Ceiling Track running perpendicular or diagonal to the Joists
This section will describe the process of fixing the ceiling track to the joists where the ceiling track is perpendicular or diagonal to the joist. The same process applies to both fixing types, only that the diagonal track will have the joist hanger brackets located in a diagonal direction. Bear in mind the diagonal method may require more frequent joist hanger brackets to ensure that the track maximum span is not exceeded. See the images below for reference to the perpendicular and diagonal fixing methods.
Follow the process below for track installation.
1. The installer must enter the room upstairs and remove the floorboards directly above the track bracket fixing points.
2. The marked out fixing locations must be moved directly in front of the joist, to allow the joist hanger bracket to suspend the track bracket. (see image below for reference)
3. Place a laser within the ceiling to ensure that a straight line is maintained when relocating holes.
4. To perfectly position the hole, the joist hanger bracket must be fitted onto the joist first.
5. Inspect the condition of the joists, ensure they are suitable and no damage that may cause an issue to safety or function to the joist is present. (e.g. Rotten, cracked)
6. On the joists, pilot holes must be drilled into the inner face where the joist hanger bracket coach bolts are to be fitted. Using the profile of the joist hanger bracket to locate the correct fixing point, drill two holes for each bracket a depth of 50mm and a diameter of 8mm.
7. Secure the joist hangers into position on the inner joist face using the given 12.0x50mm coach bolts.
8. Once the joist hanger is fitted, the hole in the ceiling can be relocated directly below the joist hanger bracket, use a 12.5mm diameter drill bit to drill through the ceiling.
9. The unused holes should be filled to tidy the ceiling.
10. A piece of threaded bar must now be cut to length to suspend the track bracket from the joist hanger bracket to the ceiling. Each threaded bar will vary in length depending on the joist and ceiling height. Ensure to allow additional thread for the fixings.
11. Insert the threaded bar through the joist hanger, lock the threaded bar off at the top by placing a fish plate, full nut and nyloc nut onto the joist hanger.
12. Place a fish plate up against the underside of the joist hanger.
13. Insert the threaded bar through the joist hanger bracket, lock the threaded bar off at both ends by placing a fish plate and two half nuts on either side of the joist hanger.
14. From the centre of the ceiling fixing hole, the 40×40 box section profile must be cut out.
15. Place the box section through the ceiling and onto the threaded bar, the box section should become flush with the steel channel and the ceiling.
16. Attach a track bracket (either a single 55mm threaded hole or a double 110mm bracket threaded hole depending on whether the bracket is securing a single track or two joining tracks) to the end of the threaded bar, and secure with a M12 half nut at the ceiling end, applying Loctite 270 to the half nut.
17. The track bracket should become flush with the ceiling and box section.
Repeat all relevant steps to fit the next track bracket, ensure the gap between the two fixings are suitable to the section 1.1.
It is likely that the fixings will have to be relocated to the closest joist to ensure that the ceiling track span is not exceeded.