Window brackets are one of two methods used to fix the ceiling track onto an I beam steelwork. Always ensure that the window bracket is being installed onto good condition steelwork, ensure that no cracks or other weaknesses are found during placement.
The fixing point for each window bracket (along the full track installation) should be determined to ensure that the installation is suitable. There are two methods of fixing the window brackets to the steelworks, this depending on the required location of the track bracket.
The processes below can be followed as a guide on how to correctly install the window brackets onto a steel I beam.
See section 4.1 for guidance on how to mark out the track bracket positions on the ceiling correctly before fixing any window bracket to the steelwork.
4.3.1 Fixing the Window Bracket Directly to a Singular I Beam
When the track is to run perpendicular or diagonal to the I beams, this fixing method is used to secure the track bracket with window brackets. It is also used when the track runs parallel but is located directly below the I beam. This means that the fixing will only require a singular I beam. Follow the guidance below for the correct fixing method.
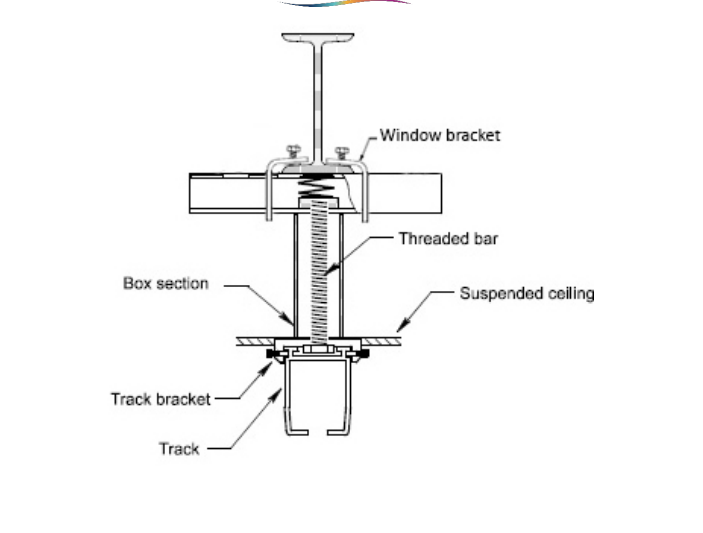
1. A piece of steel channel must be cut to a suitable length, this must incorporate the width of the I beam and additional length to fix the window brackets either side.
2. Place a spring channel nut into the steel channel and place it central. (this will be directly above the position of the track bracket on the false ceiling)
3. The track bracket centre point should be marked on the I beam, as per section 4.1.
4. Position the steel channel flush against the I beam, with the spring channel nut central.
5. Two window brackets are required to fix on either side of the I beam.
6. Place the window bracket onto the steel channel, ensuring that the plate sits onto the I beam flange.
7. Tighten the window bracket screw until the bracket is solid and secure.
8. Repeat this fixing method for both window brackets on either side of the I beam.
9. There should be no movement between the three mating parts.
10. A piece of threaded bar can be cut to length from the steel channel to the height of the ceiling.
11. Insert the threaded bar into the spring channel nut. Loctite 270 should be applied for additional security.
12. Clamp the threaded bar to the steel channel using a fish plate and two M12 half nuts.
13. A piece of 40×40 box section must be cut to length from the steel channel to the height of the ceiling.
14. From the centre of the ceiling fixing hole, the 40×40 box section profile must be cut out.
15. Place the box section through the ceiling and onto the threaded bar, the box section should become flush with the steel channel and the ceiling.
16. Attach a track bracket (either a single 55mm threaded hole or a double 110mm bracket threaded hole depending whether the bracket is securing a single track or two joining tracks) to the end of the threaded bar, and secure with a M12 half nut at the ceiling end, applying Loctite 270 to the half nut.
17. The track bracket should become flush with the ceiling and box section.
4.3.2 Fixing the Window Bracket between two I Beams
When the track is to run parallel and in between two I beams, this fixing method is used to secure the track bracket with window brackets. This means that the fixing will require two I beams to secure the track bracket. Follow the guidance below for the correct fixing method.
1. A piece of steel channel must be cut to a suitable length, this must incorporate gap between the two I beams, the width of the I beams and additional length to fix the window brackets either side.
2. Position the steel channel flush against the I beams.
3. Four window brackets are required to fix onto the two I beams, one on either side of each beam.
4. Place the window bracket onto the steel channel, ensuring that the plate sits onto the I beam flange.
5. Tighten the window bracket screw until the bracket is solid and secure.
6. Repeat this fixing method for all four window brackets on either side of the two I beams.
7. There should be no movement between the three mating parts.
8. A piece of threaded bar can be cut to length from the steel channel to the height of the ceiling. The threaded bar must allow additional length to place the bar through the steel channel and for fixings.
9. The track bracket centre point should be marked on the ceiling above, place the threaded bar through the steel channel directly below the track bracket marked position.
10. Secure the threaded bar using two half nuts and a fish plate on either side of the steel channel.
11. A piece of 40×40 box section must be cut to length from the steel channel to the height of the ceiling.
12. From the centre of the ceiling fixing hole, the 40×40 box section profile must be cut out.
13. Place the box section through the ceiling and onto the threaded bar, the box section should become flush with the steel channel and the ceiling.
14. Attach a track bracket (either a single 55mm threaded hole or a double 110mm bracket threaded hole depending whether the bracket is securing a single track or two joining tracks) to the end of the threaded bar, and secure with a M12 half nut at the ceiling end, applying Loctite 270 to the half nut.
15. The track bracket should become flush with the ceiling and box section.
