To fix a zykon fixing, it must be determined that the concrete is solid and has a minimum depth of 45mm to accommodate the fixing. Always ensure that the zykon fixing is being installed into good condition concrete, ensure that no cracks or other weaknesses are found during placement. The fixing point for each Zykon fixing (along the full track installation) should be determined to ensure that the installation is suitable. Per track bracket installation, two Zykon fixings are required, this will spread the load between the two fixing points.
The process below can be followed as a guide on how to correctly install the Zykon fixings into a concrete ceiling. This guide should be followed along with the manufacturer’s instructions.
See section 2.1 for guidance on how to mark out the track bracket positions on the ceiling correctly before fixing any Zykon fixing to the ceiling.
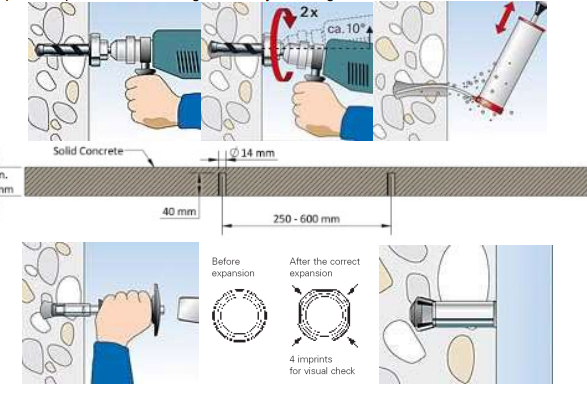
- From the track bracket centre point marked on the ceiling, a Zykon fixing must be fitted either side.Depending on any obstacles, mark out fixing positions on the ceiling. The two fixings are ideally fixed between 250mm and 600mm from each other. But it is acceptable for them to go up to 1000mm if necessary.
- A laser should be used to ensure that the marked-out positions are in line with the centre hole.
- Using a suitable drill and the universal Zykon drill bit 40×14, drill both holes into the concrete. The drill bit should reach its maximum depth for the Zykon fixing to be fitted.
- A circular deflection movement of the drill allows conical undercutting of the hole. It provides the anchor with the exact undercut which is needed for the positive locking fit which is virtually free of expansion pressure.
- Once the holes have been drilled, they must be cleaned out, a hoover, air gun or hole brush will suffice.
- The Zykon fixings can be placed up against the hole ready for fitting.
- The Fischer Setting Tool FZED 14 plus will fit into the rear of the Zykon fixing nicely, position it correctly, and use a hammer to hammer the Zykon fixing into the ceiling.
- Correct installation of the Zykon fixing will result in a distinctive pattern on the base of the Zykon fixing, see the image below for reference.
- Repeat this process for the fixing of each Zykon fixing.