The section below will include the full process of installing a turntable into a concrete ceiling, this will include the positioning and accurate marking out and the fixings used to mount a turntable.
7.3.1 Marking out the Turntable Fixing Positions into Concrete
1. A suitable location for the turntable must be chosen, this must be considered with the use of the pull cord in mind (manual only) and the direction of the take-off tracks regarding obstacles.
2. Ensure that the turntable itself is also clear of any obstacles.
3. Where false ceilings are present, remove the tiles to inspect the roof space for any obstacles as well as inspecting the concrete for suitable fixing points.
4. Using a turntable base plate template, align this on the ceiling where the installation is desired.
5. Mark out the chosen four fixing points onto the ceiling using a marker/pencil. The four fixings should measure to be 305mm apart. See section 7.2 (above) on turntable fixings for further details on fixing points.
6. Using a 12.5mm drill bit, drill the holes into the false ceiling.
7. From here, measure directly vertically, using a laser to mark out on the concrete ceiling where the four fixing points will align.
7.3.2 Concrete Ceiling Fixings used for Turntables
To fix the turntable to a concrete ceiling, threaded bar with chemical resin and Zykon fixings remain the chosen fixings to support the turntable.
Refer to section 2.1 and 2.2 for full details on fixing the fixings to the ceiling. But note the following points.
1. Four Zykon fixings / threaded bar (chemical resin) are required to install the turntable.
2. Refer to section 7.3.1 to mark out the four fixing points on the ceiling.
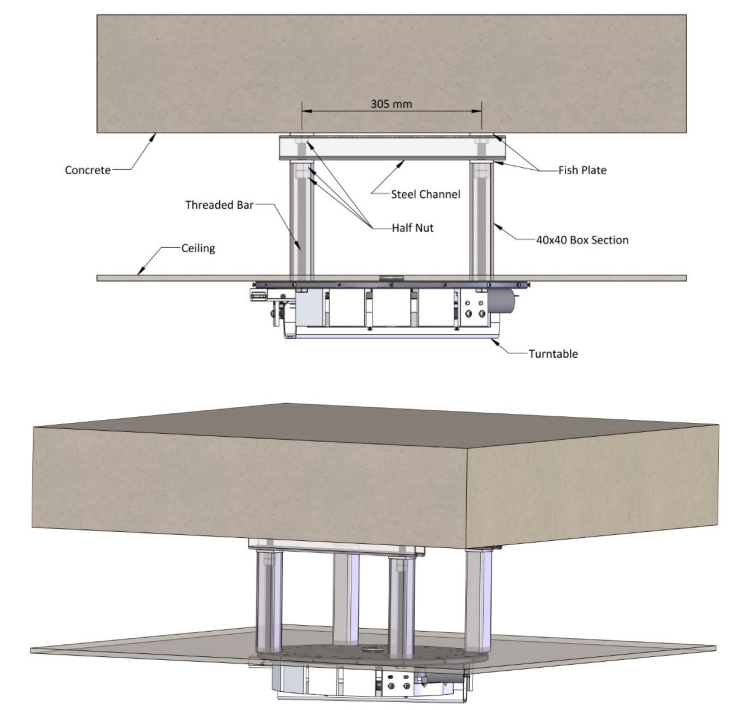
7.3.3 False Ceiling with under 200mm Roof Space
Some buildings will have a very small roof space/void which will require the fixing method shown below. There is not enough roof space to create the solid structure within. Therefore, a threaded bar will suspend the track bracket directly from the height of the concrete ceiling. Follow the process below to secure the track bracket against the false ceiling.
1. When Zykon fixings have been used, four pieces of M12 threaded bars must be cut to a length, this length must protrude through the ceiling and allow the turntable to be fixed, the bar can be cut shorter to suit during the turntable mounting.
2. For additional strength, Loctite 270 can be applied to the threaded bar where it threads into the Zykon.
3. Depending on the gap size between the two fixings, a piece of steel channel must be cut to a suitable length. If the gap size is between 250mm and 600mm, a single piece of steel channel will suit. If the gap size is between 600mm and 1000mm, a piece of double steel channel must be used and cut to a suitable length.
4. A pair of Zykon fixings will be linked using the steel channel. Therefore, two individual steel channels will be fixed to the Zykons in parallel. See image below for further details.
5. Fix the steel channels onto the threaded bars and secure in place with a fish plate and two half nuts.
6. The steel channel should be flush with the concrete ceiling. (if the concrete is not level, place some M12 washers onto the threaded bar to level the steel channel)
7. With the threaded bars protruding through the ceiling, four 40×40 box section templates can be cut out of the tile.
8. Four pieces of 40×40 box section must be cut to length to be placed onto the threaded bars and down to the ceiling height.
9. Place the box sections through the ceiling and onto the threaded bars, the box sections should become flush with the steel channel and the ceiling.
10. The turntable is ready for mounting
(note: the turntable should be mounted at the same time as the box section as there is nothing securing the box section in place)
Repeat all relevant steps to fix each turntable fixing points. Ensure the gap between the mounting positions remain 305mm for successful turntable installation.
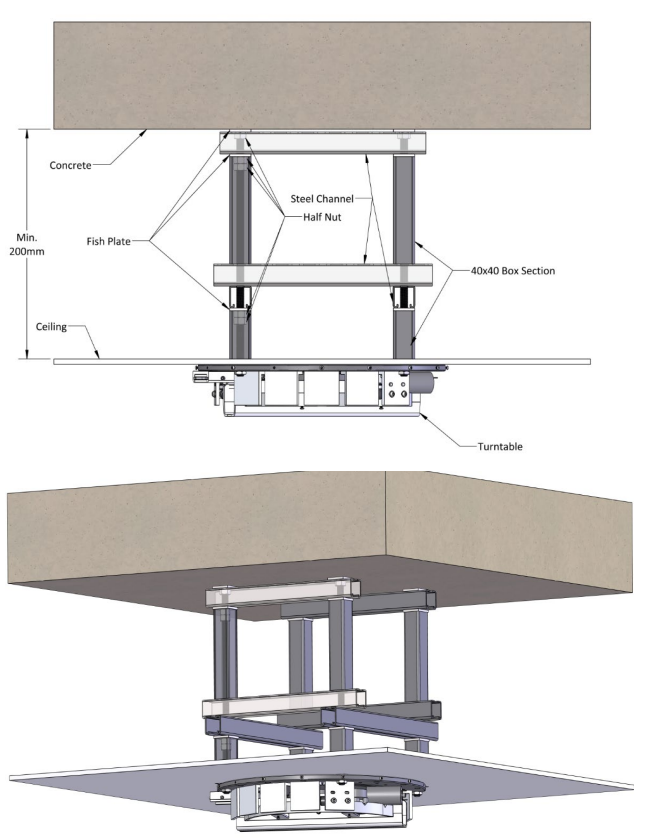
7.3.4 False Ceiling with over 200mm Roof Space
When the roof space is over 200mm in height, the process below is the standard solution to creating a fixed solid structure from the concrete ceiling to the false ceiling, threaded bar with a length of over 200mm directly from a concrete ceiling to a false ceiling will allow too much swing in the turntable making it feel insecure. It must be strengthened using steel channel and box section. Follow the process below for a secure fixing of the track bracket against the false ceiling.
1. When Zykon fixings have been used, four pieces of M12 threaded bars must be cut to a length, this length must protrude through the ceiling and allow the turntable to be fixed, the bar can be cut shorter to suit during the turntable mounting.
2. For additional strength, Loctite 270 can be applied to the threaded bar where it threads into the Zykon.
3. Depending on the gap size between the two fixings, a piece of steel channel must be cut to a suitable length. If the gap size is between 250mm and 600mm, a single piece of steel channel will suit. If the gap size is between 600mm and 1000mm, a piece of double steel channel must be used and cut to a suitable length.
4. A pair of Zykon fixings will be linked using the steel channel. Therefore, two individual steel channels will be fixed to the Zykons in parallel. See image below for further details.
5. Fix the steel channels onto the threaded bars and secure in place with a fish plate and two half nuts.
6. The steel channel should be flush with the concrete ceiling. (if the concrete is not level, place some M12 washers onto the threaded bar to level the steel channel)
7. Four pieces of 40×40 box section must be cut to a suitable length, this length will be as close to the false ceiling as possible (around 120mm), leaving enough space for two layers of steel channel and the required fixings.
8. Place the four box sections onto the threaded bars and then secure them in position by placing the steel channel below.
9. Ensure to place a fish plate between the box sections at both ends.
10. Link two threaded bars together using the steel channel and link the other two in the same fashion.
11. Now link the two the threaded bars in the opposite direction, to create a lattice. See diagram below for reference.
12. Secure the steel channels in place on each threaded bar using a fish plate and two M12 half nuts.
13. Another four pieces of box section must be cut to length, from the lattice to the false ceiling height.
14. Place the box sections through the ceiling and onto the threaded bars, the box sections should become flush with the steel channel and the ceiling.
15. The turntable is ready for mounting.
(note: the turntable should be mounted at the same time as the box section as there is nothing securing the box section in place)
Repeat all relevant steps to fix each turntable fixing points. Ensure the gap between the mounting positions remain 305mm for successful turntable installation.