The section below will include the full process of installing a turntable into a timber ceiling, this will include the positioning and accurate marking out and the fixings used to mount a turntable. Prior to installation the positions of all the joists should be mapped out and determined. This can be done using a joist finder. See section 1.6.3 for joist mapping. For simpler installation of a turntable into timber, it is recommended to install the turntable into the ceiling where no joists are positioned directly above.
7.4.1 Marking out the Turntable Fixing Positions for a Timber Installation
1. A suitable location for the turntable must be chosen, this must be considered with the use of the pull cord in mind (manual only) and the direction of the take-off tracks regarding obstacles.
2. Ensure that the turntable itself is also clear of any obstacles.
3. When 12” gapped (centre to centre) joists are present, it is highly recommended to align the turntable fixings between two joists, as the four fixing points will allow the turntable to be directly bolted to the joists. For other joists such as 14”, 16” and larger, this is not possible. But it is still recommended that at least two fixings are aligned directly below a joist for simpler installation.
4. Inspect the inside of the ceiling (where possible) to ensure that there are no clear obstacles that will affect the installation of the turntable.
5. Inspect the condition of the joists to ensure they are in suitable condition for installation. Cracking, rotten wood or any other weaknesses should be avoided.
6. Depending on the ceiling layout, the fixing method will vary.
7. Determine the best location to fix the turntable.
8. Using a turntable base plate template, align this on the ceiling where the installation is desired.
9. Mark out the chosen four fixing points onto the ceiling using a marker/pencil. The four fixings should measure to be 305mm apart. See section 7.2 (above) on turntable fixings for further details on fixing points.
10. Using a 12.5mm drill bit, drill the holes into the ceiling when no joists are present.
11. If any of the holes in the ceiling align with a joist, ensure that the hole aligns perfectly in the centre of the joist for strength and security. This may require the fixing positions to be relocated slightly. Drill into the joists using an 8mm diameter drill bit to a depth of 90mm.
7.4.2 Timber Ceiling Fixings used for Turntables
There are four methods of installing fixings into a timber ceiling, with each depending on the type of ceiling available at each install. See the four fixing methods below. Refer to section 3.0 for installation instructions within timber as additional guidance within this section. But ensure to note the following points on turntable fixings.
Fixing Method 1 – Directly into the Joists
Fixing method 1 is the recommended method of fixing a turntable. It is not always possible to use this fixing method, but more common to use in combination with one of the other methods. When the location of the turntable can be chosen, this method is the simplest fixing method available. When 12” spaced joists are within the ceiling, it is possible to fix all four turntable fixings across two joists, as shown in the image.
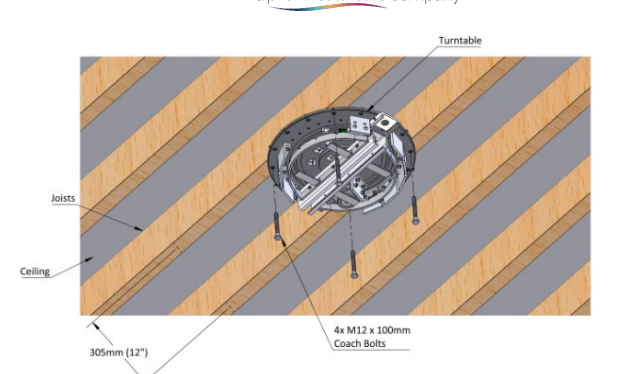
Ensure that section 7.4.1 has been complete for the alignment and fixing positions for the turntable, within this section the joist pilot holes will have been drilled and ready for turntable installation. 12.0x100mm coach bolts will be used to fix the turntable to the joists. This can only be done once the turntable has been mounted onto the ceiling. See section 7.5 for turntable mounting.
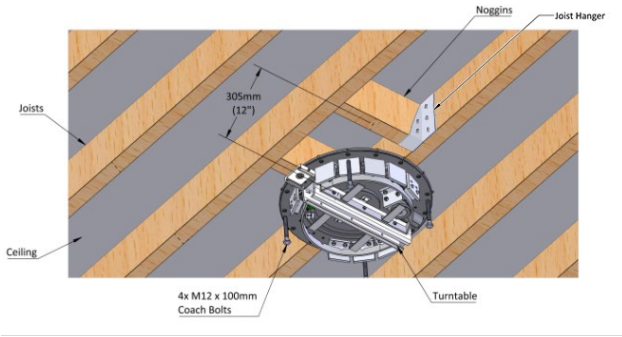
This fixing method can also be used when joists are spaced larger than 12” if noggins have been installed. Noggins can only be installed by an approved builder and must be pre-installed, this is arranged during the installation assessment. Refer to section 1.7 for further information building works requirements. Below is an image example of a turntable fixing using noggins. The same mounting process will remain the same. Ensure that within section 7.4.1 the noggins are also provided with the pilot hole.
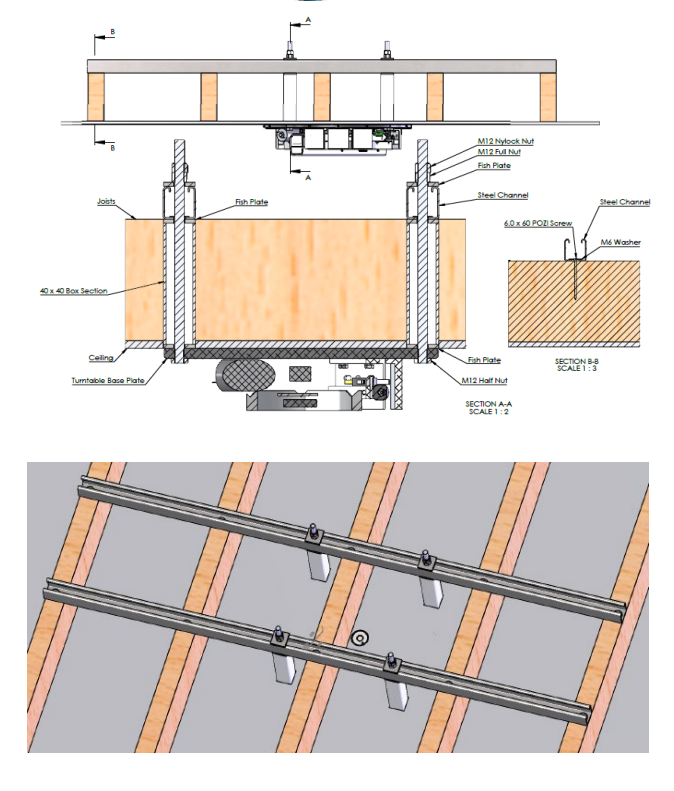
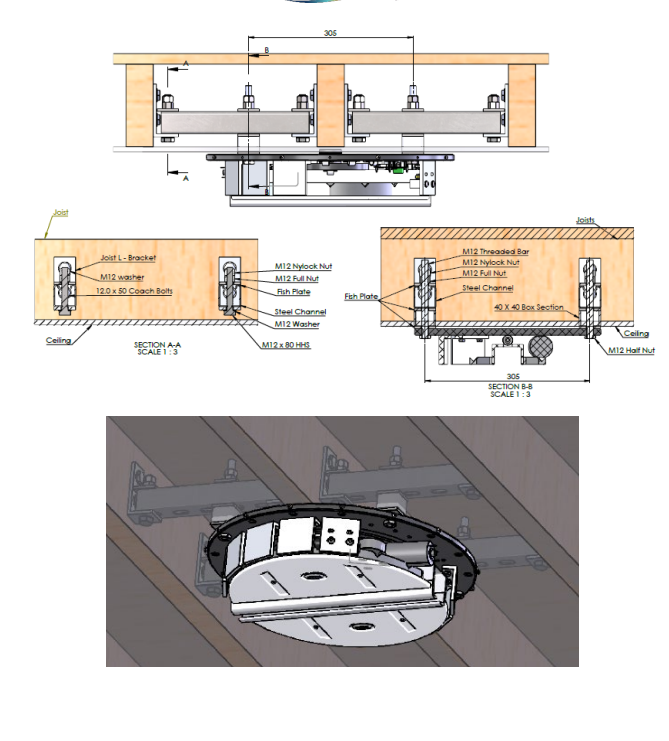
Fixing Method 2 – Ceiling with Loft Space Available
When loft space is available and at least one of the four fixing cannot be fixed directly into a joist, the following method is the best solution for fixing the turntable to the ceiling. For additional guidance along with this section, refer to section 3.2.1 for track installation into timber. Ensure to first refer to section 7.4.1 to align and mark the fixing positions of the turntable.
16. The installer must enter the loft space and locate the holes drilled into the ceiling between the joists.
17. Inspect the loft space for obstacles that may cause an issue to the installation of the steel channel.
18. Inspect the condition of the joists, ensure they are suitable and no damage that may cause an issue to safety or function to the joist is present. (e.g. Rotten, cracked)
19. See section 3.1.4 for a solution for avoiding obstacles such as piping. (this can be used as a guide for turntable installation.
20. A piece of steel channel must be cut to length to secure one or two fixing points (depending on the scenario) and span over an additional joist at either end from the fixings. (refer to diagram for reference).
21. When spanning across joists, a single steel channel will suffice.
22. Place the steel channel onto the joists directly over the turntable fixing points, refer to section 1.6.7 for information on how to even uneven joists.
23. Repeat step 7 for each fixing point.
24. Under normal conditions, two pieces of steel channel will be required to run parallel, securing one or two fixings each. (refer to diagram for reference)
25. Secure the steel channel to the joist using the 6×60 wood screws and an M6x25 penny washer.
26. Ensure to fix the steel channel at each joist the steel channel is spanning over.
27. A piece of threaded bar must now be cut to length which will suspend the turntable from the steel channel. Each threaded bar will vary in length depending on the joist and ceiling height. Ensure to allow additional thread for the fixings.
28. A piece of 40×40 box section must be cut to length to fit from the bottom of the steel channel to the top face of the turntable, this is the ceiling height.
29. Insert the threaded bar through the steel channel, lock the threaded bar off at both ends by placing a fish plate and two half nuts on either side of the steel channel.
30. From the centre of the ceiling fixing hole, the 40×40 box section profile must be cut out.
31. Place the box section through the ceiling and onto the threaded bar, the box section should become flush with the steel channel and the ceiling.
32. The turntable is ready for mounting
(note: the turntable should be mounted at the same time as the box section as there is nothing securing the box section in place)
Repeat all relevant steps to fix each turntable fixing points. Ensure the gap between the mounting positions remain 305mm for successful turntable installation.
Fixing Method 3 – Ceiling with No Loft Space Available
When no loft space is available and at least one of the four fixing cannot be fixed directly into a joist, the following method is the best solution for fixing the turntable to the ceiling. For additional guidance along with this section, refer to section 3.3.1 for track installation into timber. Ensure to first refer to section 7.4.1 to align and mark the fixing positions of the turntable.
1. The installer must enter the room upstairs and remove the floorboards directly above the turntable fixing points.
2. Inspect the fixing location for any obstacles such as wiring or piping that may cause an issue, ensure to avoid obstacles where possible.
3. Inspect the condition of the joists, ensure they are suitable and no damage that may cause an issue to safety or function to the joist is present. (e.g. Rotten, cracked)
4. On the inside of the joists, joist hanger brackets are used to fix a bridging steel channel.
5. On both joists, pilot holes must be drilled into the inner face where the joist hanger bracket coach
bolts are to be fitted. Using the profile of the joist hanger bracket to locate the correct fixing point, drill two holes for each bracket a depth of 50mm and a diameter of 8mm.
6. Once the first joist hanger is marked out, use a laser to perfectly align the opposite joist hanger position and drill the pilot holes.
7. Secure the joist hangers into position on the inner joist face using the given 12.0x50mm coach bolts.
8. A piece of steel channel can now be cut to length to bridge between the two joist hangers.
9. When spanning between two joists, single steel channel will suffice.
10. Place the steel channel onto the joist hangers.
11. The steel channel can be secured by placing an M12x80 bolt through the bottom of the joist hanger and through the steel channel. (ensure to place an M12 washer onto the bolt first)
12. Secure the bolt to the steel channel using a fish plate and two half nuts.
13. A piece of threaded bar must now be cut to length which will suspend the turntable from the steel channel. Each threaded bar will vary in length depending on the joist and ceiling height. Ensure to allow additional thread for the fixings.
14. A piece of 40×40 box section must be cut to length to fit from the bottom of the steel channel to the top face of the turntable, this is the ceiling height.
15. Insert the threaded bar through the steel channel, and lock the threaded bar off at both ends by placing a fish plate and two half nuts on either side of the steel channel.
16. From the center of the ceiling fixing hole, the 40×40 box section profile must be cut out.
17. Place the box section through the ceiling and onto the threaded bar, the box section should become flush with the steel channel and the ceiling.
18. The turntable is ready for mounting.
(note: the turntable should be mounted at the same time as the box section as there is nothing securing the box section in place)
Repeat all relevant steps to fix each turntable fixing points. Ensure the gap between the mounting positions remain 305mm for successful turntable installation.
Below is a typical example of a turntable being fitted using this method in combination with fixing directly to the joists.
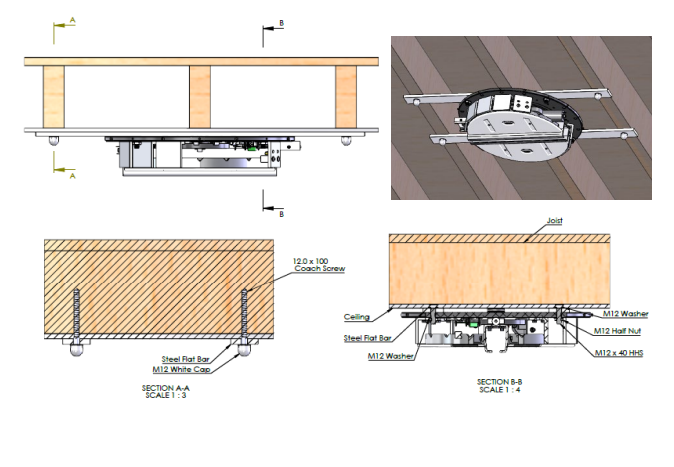
Fixing Method 4 – Ceiling with No Access to Joists
When there is no access to the joists above and at least one of the four fixing cannot be fixed directly into a joist, the following method is the best solution for fixing the turntable to the ceiling. For additional guidance along with this section, refer to section 3.5 for track installation into timber. Ensure to first refer to section 7.4.1 to align and mark the fixing positions of the turntable.
1. From section 7.4.1, the turntable fixing location has been determined. From here the centre of the two joists either side of the turntable fixing location should be marked out.
2. Use a laser to ensure that the two joists are marked out horizontally.
3. Drill out the two joist positions with a 6mm diameter drill bit to a depth of 90mm.
4. A piece of steel bar must be cut to length to be fixed to the ceiling between the joists.
5. Once the steel bar is cut, the two fixing positions must be marked out and drilled to 12.5mm.
6. The marked-out position of the turntable fixing must also be drilled out from the steel bar.
7. Place the M12x45 bolt through the centre hole of the steel bar from its top face. (the bolt head will sit inside the ceiling)
8. The M12x45 bolt is what the turntable will be fitted to during mounting.
9. Place the steel bar up onto the ceiling and secure using the 12×100 coach bolts.
10. When the turntable requires fixings directly into the joist, it will share the same fixing point as the steel bar, they can both be secured during turntable mounting.
Repeat all relevant steps for all turntable fixings, ensure the gap between the fixings remain 305mm for successful turntable mounting.