The section below will instruct the correct method of mounting the turntable onto the fixings. See previous sections to mark out a location and install the turntable fixings, this is essential before attempting to mount a turntable to the ceiling.
There are two methods of fixing the turntable to the ceiling, this is dependent on the fixings used previously. The turntable is either fixed to the threaded bar or is fixed to the joist using a coach bolt.
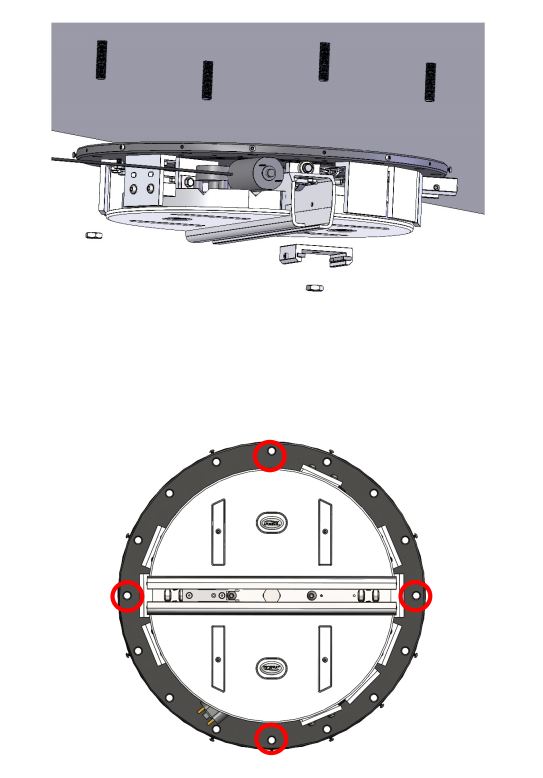
As explained in section 7.2, the turntable will be fitted into 4 mounting holes in the base plate. These fixings must be parallel and opposite to each other. It is usually preferred to fix the turntable directly to the base plate fixings, but this is not always possible due to the locations of the track brackets, these can clash with the fixing point, depending on where the take-off tracks are required. When this occurs, the fixings must also pass through the track brackets.
7.5.1 Mounting the Turntable onto the Threaded Bar
This section will explain the method of fixing the turntable directly to the threaded bars.
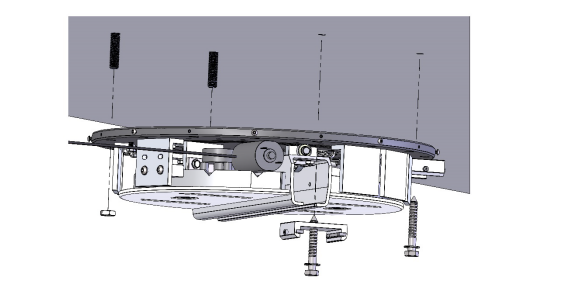
1. Place a half nut onto the thread of each threaded bar up into the ceiling, this should be above the height of the turntable installation.
2. The turntable fixing points must be drilled out using a 12mm dill piece to remove the thread on the base plate.
3. The turntable can be raised up to the ceiling in its desired orientation, (this should have been predetermined due to where the runoff track positions have been installed) and placed onto the threaded bar fixing points.
4. Place the turntable up against the ceiling.
5. The ceiling may be causing an obstruction to the bearing in the centre of the turntable. If this occurs, a circle of material must be removed from the ceiling, 45mm in diameter and 10mm in depth. This will allow the turntable to fit flush onto the ceiling.
6. When the ceiling is not level, shim washers can be placed onto the threaded bar between the ceiling and the base plate to level the turntable out.
7. Secure the turntable by tightening an M12 half nut onto the threaded bar below the base plate.
8. When the fixing has been placed through the track bracket, an M12 half nut is essential to allow track installation later.
9. Tighten the pre-installed (step 1) half nut to the top of the base plate, this nut will fit within the ceiling.
10. With both half nuts installed on either side of the base plate, the turntable cannot move.
7.5.2 Mounting the Turntable directly to the Joist
When the turntable fixings points are to be fixed directly into the joist above. Threaded bar cannot be used to fix the turntable. Coach bolts are the recommended solution. As instructed in section 7.4.2 – method 1 fixing, the fixing points in the joist should have been determined and drilled to 6mm diameter and 90mm deep.
When there are a mix of direct joist fixings and threaded bar fixings, follow section 7.5.1 to mount the turntable onto the threaded bar fixings first, then proceed to mount directly onto the joist.
1. The turntable fixing points must be drilled out using a 12mm dill piece to remove the thread on the base plate.
2. Align the turntable fixing holes with the pre-drilled holes within the joist.
3. Ensure that the turntable is aligned in its desired orientation, (this should have been pre-determined due to where the runoff track positions have been installed).
4. The ceiling may be causing an obstruction to the bearing in the centre of the turntable. If this occurs, a circle of material must be removed from the ceiling, 45mm in diameter and 10mm in depth. This will allow the turntable to fit flush onto the ceiling.
5. When the ceiling is not level, shim washers can be placed between the ceiling and base plate fixing points to level the turntable out.
6. Secure the turntable directly to the joist by screwing in coach bolts through the mounting holes and into the joist fixing locations.
7. The coach bolts must be fixed flush against the base plate, with a washer in between.
8. The coach bolt can also be used when fixing through a track bracket.