The singular gantry leg fixing method is used when the ceiling and wall is not suitable for fixing the track system. Only straight track is suitable for singular gantry leg fixings, all straight tracks included in this manual are suitable for fixing.
Two singular gantries are required at either end for the system to be complete. A gantry installation can be fitted in a in a straight line or in a diagonal direction as long as the fixings remain level. The gantry system must be fixed up against a wall for additional stability, with the leg base against the floor. When there are obstacles affecting the installation, refer to section 6.2 for the goal post gantry leg and other specialist gantry fixings.
The section below will give full instruction on the recommended method of installation for a ceiling track system using a gantry fixing.
A full assessment should have been conducted to ensure that the floor and wall is safe for installation, but the installation engineer must always be vigilant and ensure that the track fixing locations are safe, any signs of cracking, or any other damage to the fixing materials should be avoided.
6.1.1 Aligning a Gantry to Gantry Fixing Method onto the Floor/Wall
When a track system is installed onto a gantry fixing, it is essential to ensure that the track system is level to ensure that the fixings will align. Each gantry requires the Fischer 5×37 metal cavity fixings with screws for installation. Follow the guidance below for alignment.
1. Measure the distance between the two gantry positions.
2. Determine the spanning requirements of the track system and choose a suitable track type for the installation at hand. See section 1.1 for maximum track spans.
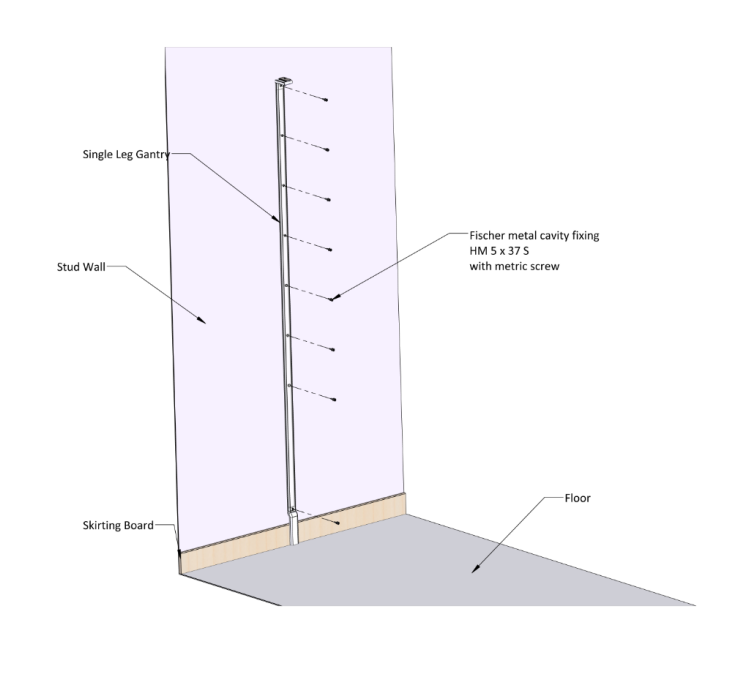
3. Determine a suitable location for the first gantry fixing. This should be on the floor up against the wall, the gantry leg accommodates for skirting boards.
4. When positioning the gantry, ensure that the stud wall provides suitable fixing locations where the gantry is to be fixed, along with this, ensure that the floor is level for the base of the gantry.
5. Along the full length of the track installation, any obstacles must be avoided, this includes obstacles such as light fixings, sprinklers, etc. To accommodate this, the gantry system’s maximum height should be 50mm below the lowest obstacle on the ceiling.
6. Measure the height from the floor to the ceiling to determine the required height of the gantry leg. From here the gantry can be cut to size to suit the room.
7. Align the gantry in its desired location and mark out the fixing positions on the wall.
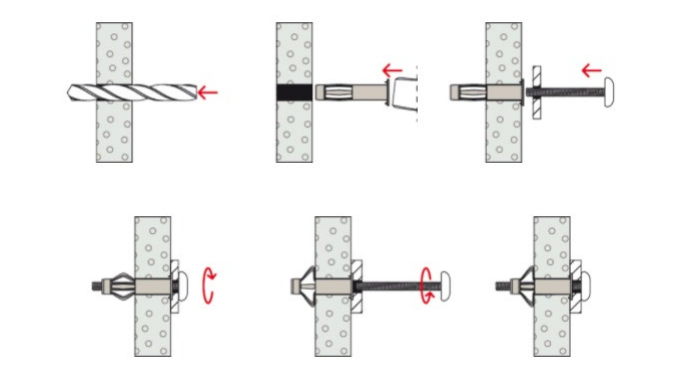
8. For the stud wall, the holes must be drilled using a 10mm drill bit to a depth of 37mm.
9. Insert the Fischer 5×37 metal cavity fixing (sleeve) into the stud wall.
10. Ensure to follow the relevant steps for the opposing gantry leg.
6.1.2 Fixing the Singular Gantry Leg to the Floor/Wall
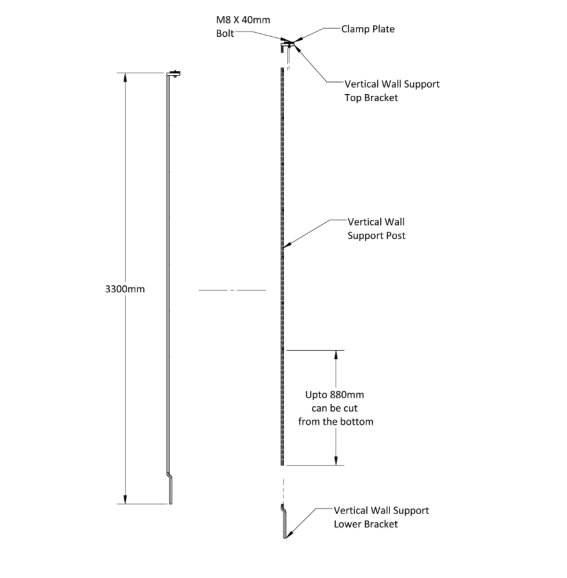
The singular gantry must be cut to length to suit the installation at hand. The bottom end of the gantry leg is designed to be cut to length. Once this is done, follow the guidance below. See section 5.1.1 for guidance on how to mark out the gantry fixing positions on the wall correctly before proceeding to fixing the gantry.
Follow the guidance below to fix the gantry in position.
1. Once the gantry leg is cut to suit, slot the gantry foot onto the bottom end of the leg.
2. Slot the gantry head onto the top end of the leg.
3. Screw the Fischer screws 5x37mm into the wall to secure the gantry. This will secure the gantry foot and head to the gantry leg. (see image below on how the sleeves interact with the stud wall)
4. Repeat the relevant steps to secure the second gantry system.
No track brackets are required to fix the ceiling track to the gantry system, follow the process below to install the track. The ceiling track hoist must be inserted into the ceiling track prior to securing the track to the gantry, this will require a minimum of two installation engineers to ensure that the track remains level when positioning it on top of the gantry.
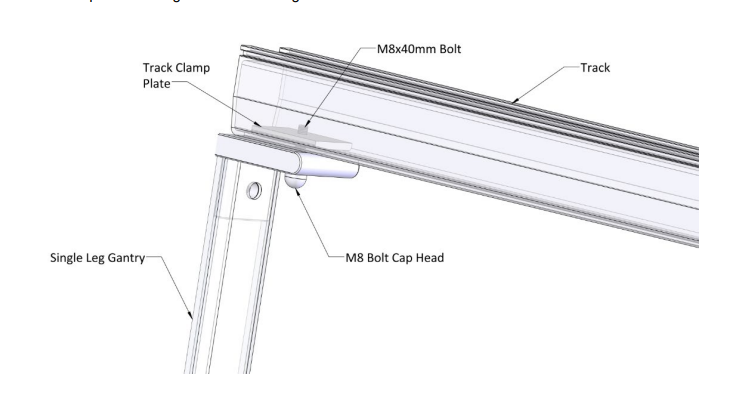
1. Once the hoist is located inside the track system, place the track on top of the two gantry system fixings. While locating the track against the wall, it is important to also locate the steel fixing plates at either end of the track directly above the gantry fixing. See the image below for reference.
2. Using the M8x40 bolt provided, clamp the track in place by tightening the gantry head, track, and steel fixing plate together. See the images below.
3. Repeat the fixing method for both gantries.