4.2.4 Installing Charging Dock Type 4 (Track Type 1) – QRT Hoist
To install the TX Charger, follow the guidance below:
1. Complete all relevant steps in 4.1 to gain access to the Ceiling Track.
2. A step ladder is recommended for easier and safer installation.
3. Align the Charger as shown in Image, the Charger must be inserted into the track backward (as shown) and must slid all the way to the other end of the Track. This ensures that the Charger is facing inward and allow the Hoist to dock.
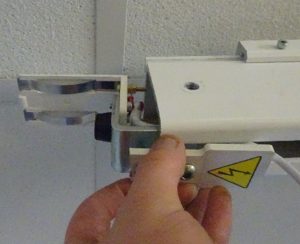
4. Position the Charger in front of the Safety Bolt bumper to achieve maximum track length.

5. Fix the Charger in place using a 5mm Allen Key to tighten the two bolts. Ensure the Charger is positioned straight in the track.

6. Place a self-adhesive clip onto the track directly above the Charger.
7. Fit the locking pin attached to the charger via a chain into the clip for safe keeping

8. Route the Charger wire in a tidy fashion to the closest power supply.
9. The Charger block locates into its bracket as shown in image. Raw Plugs and Screws are provided to fix the unit to the wall if desired.

10. Choose a suitable location on the buildings wall where the charging unit can be fitted. The wall must be of good structure to fit the three screw fixing points.
11. Drill three 7mm holes into the wall that will allow the three given brown raw plugs to be fitted, measure the gap between the three drilled holes to match the profile of the of the charging unit bracket.
12. Place the raw plugs into the drilled holes.
13. Align the charging bracket fixing point with the holes and use a pozi head screwdriver to fix the two screws and secure the bracket to the wall.

14. Fit the Charging Unit into the Bracket.
15.Plug the Charger into the nearest wall socket and turn on the power supply.
16. Drill a 9mm hole in front of the charger for the trolley set dismount point.
17. Place the trolley set dismount point sticker onto the hole as shown in image.

18. The Charging Dock is ready for use.
19. If a Hoist is not being installed directly after charger installation. Refer back to section 4.1 to refit the removed track components to close access to the Ceiling Track.