4.2.7 Installing the Power Supply to Constant Charge – (Track Type 2)
To install the TX Charger, follow the guidance below:
1. Complete all relevant steps in 4.1 to gain access to the Ceiling Track.
2. A step ladder is recommended for easier and safer installation.
3. Place a positive and negative sticker on either side of the track, (if there isn’t any already).

4. Using a 3mm Allen key, loosen the grub screw to release the terminal port from the track.
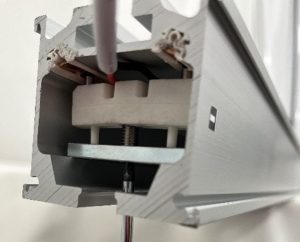
5. Remove the terminal port.
6. Remove the two dowel pins which secures the cables into the terminal port, use pliers to remove the pins.

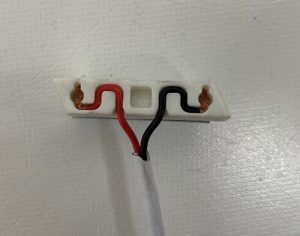
7. Remove the cables from the assembly and route the provided charger cable as shown. Ensuring that the live and neutral wires (red and black) are aligning to the positive and negative stickers on the track.
8. Refit the dowl pins into the terminal port.
9. Place the terminal port back into the track, ensure that the charging cable is routed outward/away from the track.
10. Tighten the grub screw using the 3mm Allen key until the terminal port is secure within the track, also ensure that it is aligned straight within the track, not angled. 
11. Route the power supply cable through the bottom of the track, to allow the end stop, safety bolt to be fitted in front and end cap to be refitted behind.

12. Refit the end stop, safety bolt and end cap to the track. See section 4.1 for guidance.
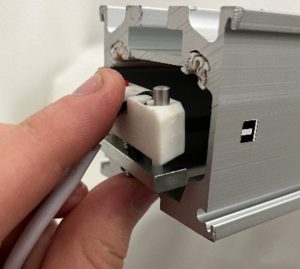
13. Route the Charger wires in a tidy fashion to the closest power supply.
14. The Charger block locates into its bracket as shown in image. Raw Plugs and Screws are provided to fix the unit to the wall if desired.

15. Choose a suitable location on the buildings wall where the charging unit can be fitted. The wall must be of good structure to fit the three screw fixing points.
16. Drill three 7mm holes into the wall that will allow the three given brown raw plugs to be fitted, measure the gap between the three drilled holes to match the profile of the of the charging unit bracket.
17. Place the raw plugs into the drilled holes.
18. Align the charging bracket fixing point with the holes and use a pozi head screwdriver to fix the two screws and secure the bracket to the wall.

19. Fit the Charging Unit into the Bracket.
20. Plug the Charger into the nearest wall socket and turn on the power supply.
21. The Charging Dock is ready for use.